Tutorial Details:
- Program: Adobe Photoshop CS2
- Version: 9
- Difficulty: Medium
- Estimated Completion Time: 1 to 1.5 hours
Step 1 - Create the Photoshop document
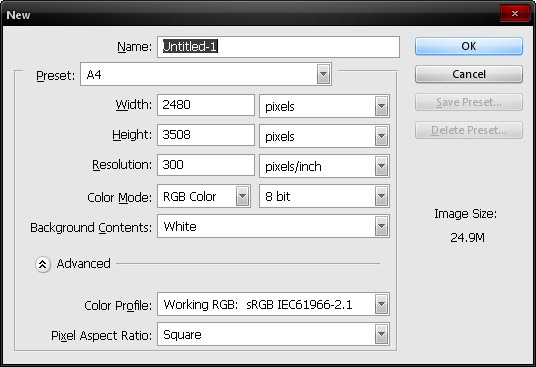
To start things off, let’s open a new image file, go to the Menu bar and click on File > New, then when the box opens, locate the Preset drop-down menu and click on A4 from the menu, or you may input following settings:
- Width: 2480 pixels
- Height: 3508 pixels
- Resolution: 300 dpi
- Color Mode: RGB Color; 8bit
- Background Contents: White
A landscape type of canvas is what we need for this image, so we would need to rotate the newly created layer; when the new layer opens, go to Image > Rotate Canvas > 90’ CW.
Step 2 - Create the water room
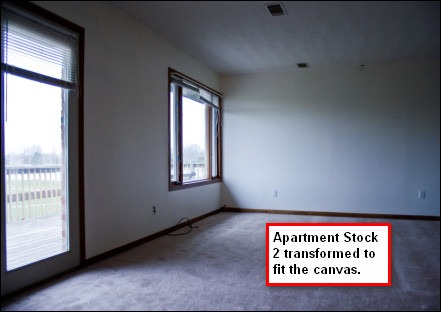
In this step, we will create a room filled with water. To start, let’s open our fine stock image: Apartment Stock 2. After you’ve opened it, we won’t be doing anything to it, except moving it to our A4 canvas. Activate the Move tool (V) and drag the image to our canvas and then activate the Transform tool (Ctrl/Cmd + T) to scale the image to fit our canvas.
To use the Transform tool, drag the small box/s to a direction which would successfully transform the image.
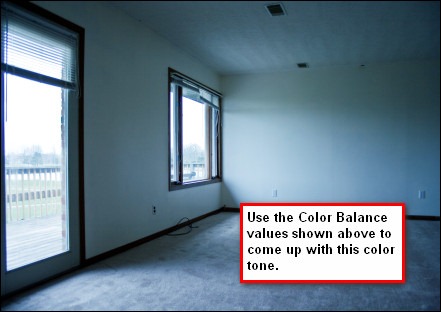
Now, we would need to change our room’s color tone. On the Menu bar, go to Image > Adjustments > Color Balance or you may simply hit the shortcut key which is Ctrl/Cmd + B and then input the following values:
- Color Balance: -40, 0, +10
- Tone Balance: Midtones
- Preserve Luminosity: Checked
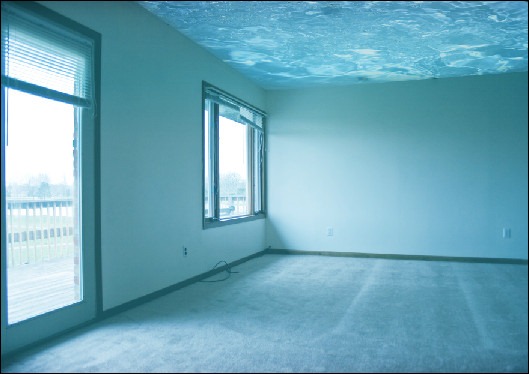
Next, we will be changing the ceiling into water! Open the stock image: Water and drag it to our canvas using the Move tool (V). Upon moving, let’s change the name of this layer to “water ceiling” to avoid confusion throughout the creation process. To rename a layer, double-click on the word “layer 1” and the text box would appear and you may now rename the layer.
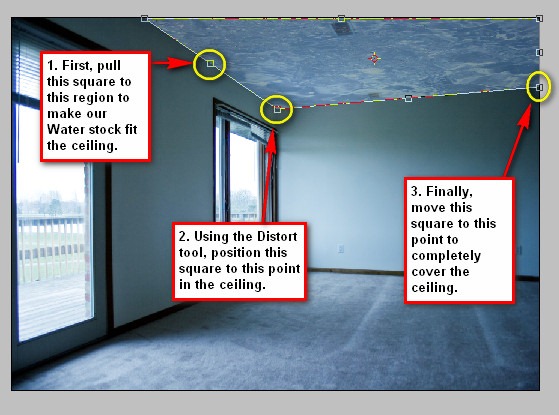
Notice the ceiling, how do you think we would transform our “water ceiling” so it would fit the real ceiling’s shape? It’s easy; we will utilize the power of the Distort tool! Activate the Transform tool (Ctrl/Cmd +T) and right click on our image to bring up the contextual menu, when the menu appears, click on Distort.
So you won’t have a hard time transforming the image, a good thing to do would be to reduce its opacity to 40%. To reduce an image’s opacity, go to the Layer window (to where your layers are located) and change the % value on the Opacity drop-down menu. Change it to 40%. After you’ve done that, the transforming process begins. See image below:
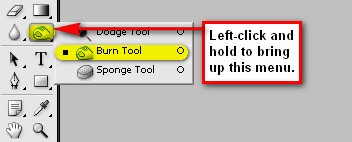
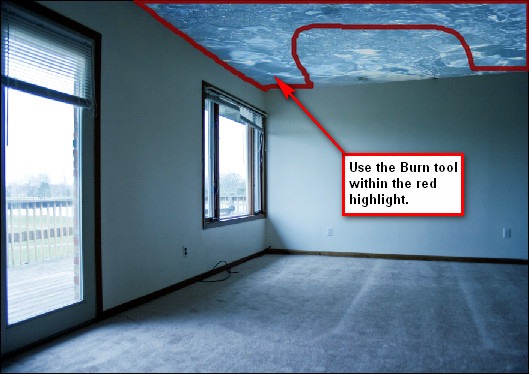
When you’re done transforming, you may increase the Opacity by 30% making it 70%. Now, we will be blending our Water stock image with the ceiling. Activate the Burn tool (O) because we would need this to darken some regions of the water ceiling.
Input the following settings for our Burn tool (O).
- Brush size: 500 px
- Hardness: 0%
- Range: Midtones
- Exposure: 25%
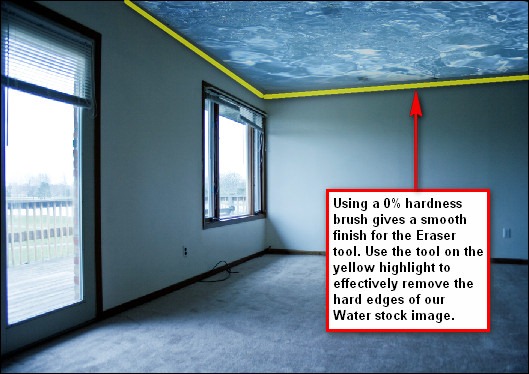
Next, we will be erasing the edges of our “water ceiling” to make the blending more seamless. Activate the Eraser tool (E) and use the following settings:
- Brush size: 125 px
- Hardness: 0%
- Opacity: 25%
- Flow: 100%

Finally, let’s change its color tone. While the “water ceiling” layer is selected, press Ctrl/Cmd + B to adjust the Color Balance of the selected layer and then input the following values:
- Color Balance: -40, 0, -36
- Tone Balance: Midtones
- Preserve Luminosity: Checked
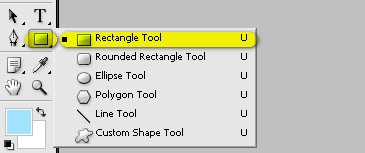
Next let’s create an effect similar to how our eyes work when it is open underwater. To do this, let’s activate the Rectangle tool (U).
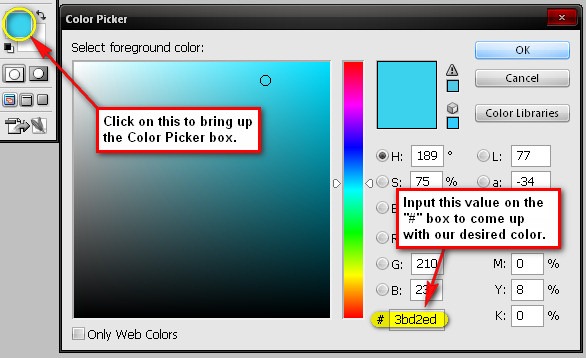
Before creating a rectangle, let’s set its color. Click on the Color Picker square located on the tools menu and input the following on the “#” box.
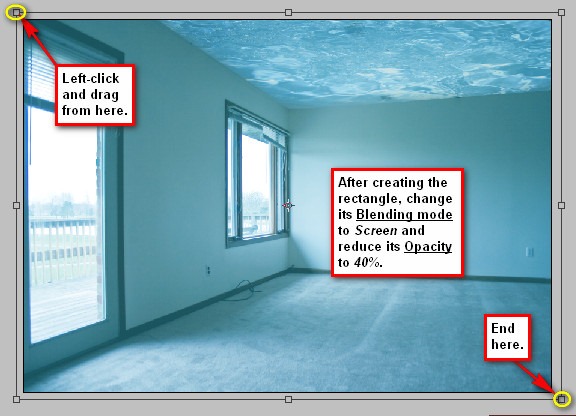
With the Rectangle tool activated and the color set, let’s create the rectangle.

After that, let’s rename the layer to “haze 1”.
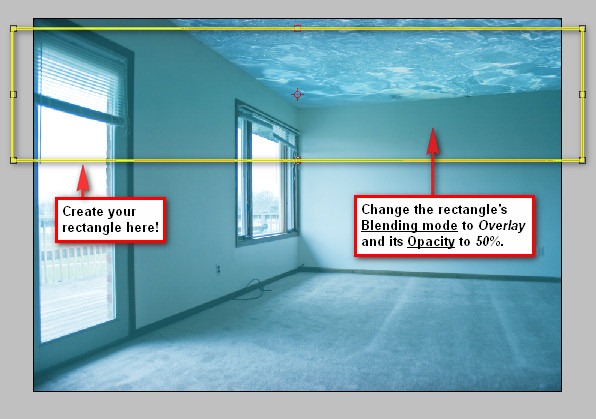
Let’s create another rectangle because we would need to darken the area on the top. Activate the Rectangle tool (U) and use the following color settings:
After that right click on the layer to bring up the contextual menu and when the menu pops up, click on Rasterize. We will need to do this to make the layer available for editing or so we could apply filters to this layer. Now that the layer has been Rasterized, go to Filter > Blur > Motion Blur from the Menu bar and input the following settings:
- Angle: 90’
- Distance: 400 px
Our image should now be similar to this:
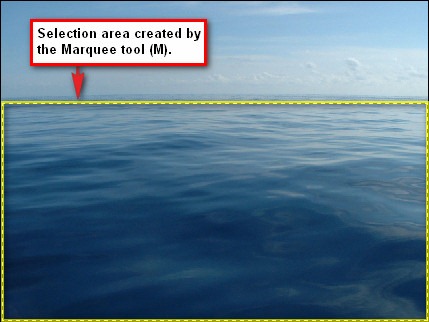
We’ve filled up the ceiling with water, we’ve changed the color tone of the room and now we’ll need to change our floor. Let’s open Calm Water stwberrystk; activate the Marquee tool (M) and left-click and drag a selection area around the ocean and drag that region to our canvas using the Move tool (V). After it has been moved to our canvas, rename that layer to “water floor”.
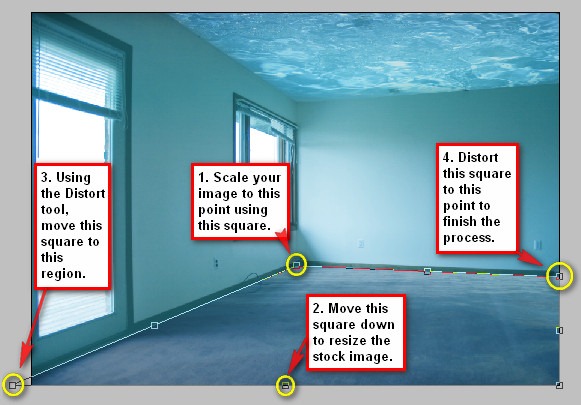
Now let’s activate the Transform tool (Ctrl/Cmd + T) because we would need the help of our Distort tool to fit our Calm Water stwberrystk stock image into the floor. With the Distort tool activated, move the squares to fit the floor. Once again, so you won’t have a hard time transforming the stock image, reduce its Opacity to 50%. See image below:
Next, change its Blending mode to Soft Light and its Opacity to 50%. We’ll also need to change its color tone to blend with the rest of the images; with the “water floor” layer selected, hit Ctrl + B to adjust the Color Balance and input the settings below:
- Color Balance: 0, 0, +45
- Tone Balance: Midtones
- Preserve Luminosity: Checked
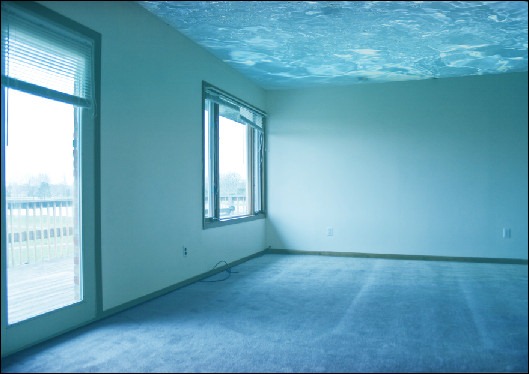
Let’s check and see how the image looks right now:

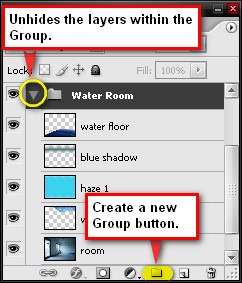
Before we proceed to the next step, let’s group the layers that we’ve created. To create a group, select all the layers that we’ve just made and press Ctrl/Cmd + G. Notice that by doing this all the layers will be hidden, you may unhide it by clicking on the “Play” button located to the left of the “Folder” icon of the new group. You may now rename the group, I recommend renaming it the “Water room” but you can use any name you wish. You may also press the Create New Group button located on the bottom of the Layer window, which is in between the Create New Fill layer/Adjustment layer button and the Create New Layer button.
STEP 3 - Insert the Lady in the Water
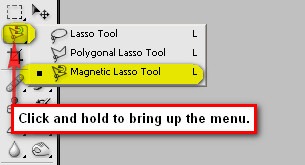
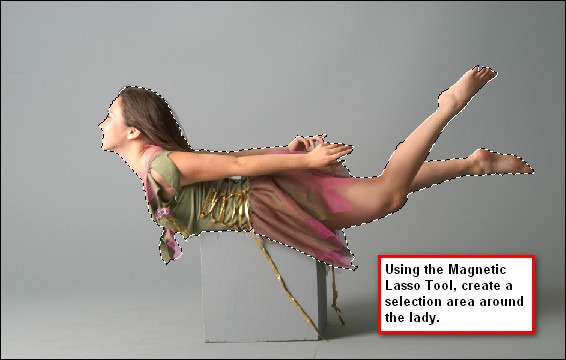
What we’re going to do on this step is that we would be inserting a lady who is swimming in the water room. Now let’s open the Fairy S – 15 stock image. Let’s activate the Magnetic Lasso tool (L); we will be using this tool to cut the fairy from the rest of the image and move it to our canvas.
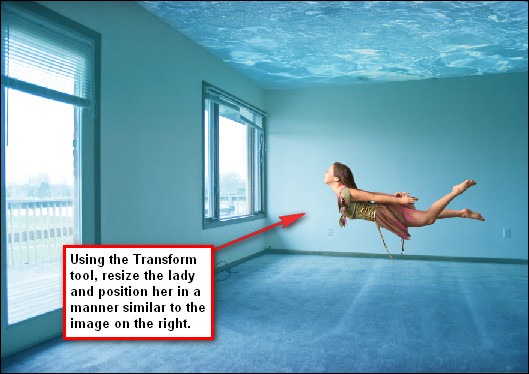
After drawing a selection area around the lady, you can now move it to our canvas. Drag it to our canvas using the Move tool (V) and then rename the layer to “lady in the water”.
Now that the “lady in the water” is in place, let’s change her color tone to make her blend in. With the “lady in the water” layer selected, press Ctrl/Cmd + B to activate the Color Balance adjustment tool and input all the values below on their respective fields:
- 1. Color Balance: -90, 0, +26
- 1. Tone Balance: Midtones
- 1. Preserve Luminosity: Checked
- 2. Color Balance: -60, 0, 0
- 2. Tone Balance: Shadows
- 2. Preserve Luminosity: Checked
- 3. Color Balance: -10, 0, +15
- 3. Tone Balance: Highlights
- 3. Preserve Luminosity: Checked
Now after you’ve done that, let’s change the Brightness/Contrast of the lady’s layer. To change adjust the Brightness/Contrast, go to Image > Adjustments > Brightness/Contrast located on the Menu bar. Input the following settings when the B/C box opens:
- Brightness: +12
- Contrast: -10
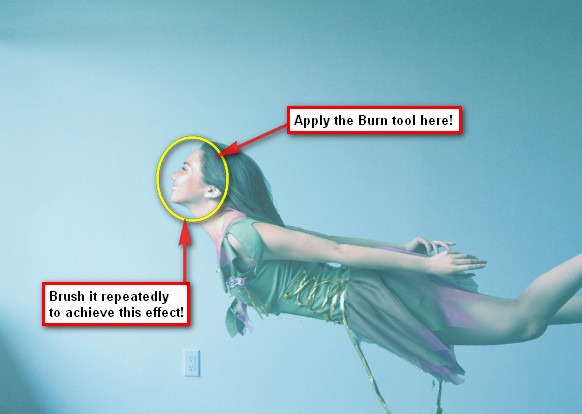
Due to the increased brightness, we can hardly see the lady’s face, so a good thing to do is to Burn her face! Yes, we will use the Burn tool (O) to darken the light on her face. Activate the Burn tool (O) and use the following settings:
- Brush size: 500 px
- Hardness: 0%
- Range: Midtones
- Exposure: 15%
Note: To be accurate in Burning, change the zoom level to 50% or more in the Navigator window.
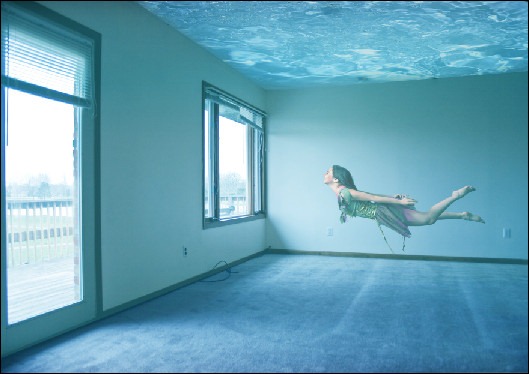
Finally, reduce her Opacity to 70%. The image should be now similar to this:
Step 4 - Create the bubbles
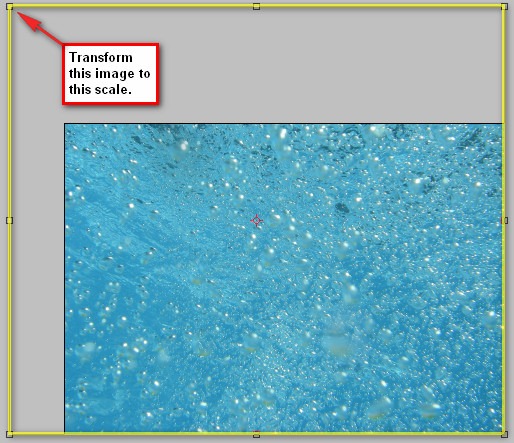
In this step we would be adding the water bubbles to add a realistic water texture and atmosphere to our image. Let’s open the Aquarium Bubbles stock and drag it to our canvas using the Move tool (V) and then rename the layer to “water texture 1”.. Upon moving it to our canvas we would need to transform it appropriately for composition purposes. Activate the Transform tool (Ctrl/Cmd + T) and resize the image. See image below:
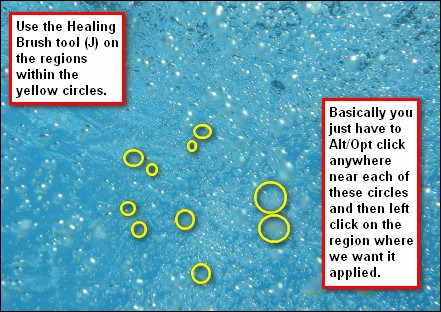
Now we would need to remove some bubbles that would potentially ruin our composition. To do that, activate the Healing Brush tool (J). Once again, remember to left-click and hold to bring up the menu in case the Healing Brush isn’t the default button on the toolbar. Using the Healing Brush tool (J) is similar to the Clone Stamp tool (S) but in this case, it doesn’t exactly clone a part of the image, but instead it chooses a source point and then it heals the region and therefore replaces and mixes the pixels which you Alt/Opt clicked on earlier. So activate the Healing Brush and follow the image below:
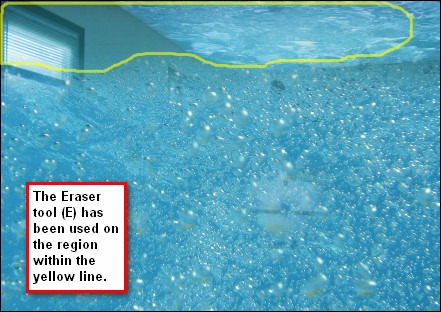
After that, we would need to erase a distracting part of our “water texture 1” layer. Activate your Eraser tool (E) and use the settings below:
- Brush size: 500 px
- Hardness: 0%
- Opacity: 100%
- Flow: 100%
Now that that’s done, let’s change the layer’s Blending mode to Soft Light, and its Opacity to 60%. If you’d notice, that texture alone isn’t enough so we would need more than one texture to get the right feel for this image. Click on our “water texture 1” layer and press Ctrl/Cmd + J to duplicate it. Once duplicated, rename the layer to “water texture 2” and change its Blending mode to Overlay and the Opacity to 20%. The result should be similar to the image below:
Step 5 - Retouch the whole image
Now on this step, we would be doing all the necessary adjustments to improve the look and feel of the whole image.
First, let’s adjust the Hue/Saturation of our image, to smoothen the impact of our image to our viewer’s eye. Click on the Create new Fill layer/Adjustment layer button which is located beside the Create New Group button on the Layer window. When the menu opens, click on Hue/Saturation. A box will open and when it does, use the following settings:
- Edit: Master
- Hue/Saturation
- Hue: 0
- Saturation: -20
- Lightness: 0
Next, let’s create a Solid Color adjustment layer from the Create new Fill layer/Adjustment layer button. When it opens, input the following:
Then change its Blending mode to Exclusion and set its Opacity to 40%.
After that, let’s create a Levels adjustment layer. Input the following settings when it opens:
- Channel: Red
- Input levels: 15, 1.00, 255
- Output levels: 0, 255
- Channel: Blue
- Input levels: 15, 1.00, 255
- Output levels: 0, 255
Now let’s create another color adjustment through the use of a Photo Filter adjustment layer. Use the following settings:
- Filter: Sepia
- Density: 25%
- Preserve Luminosity: Checked
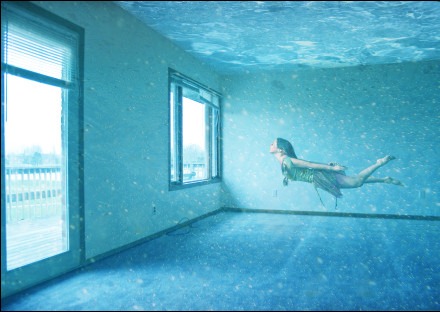
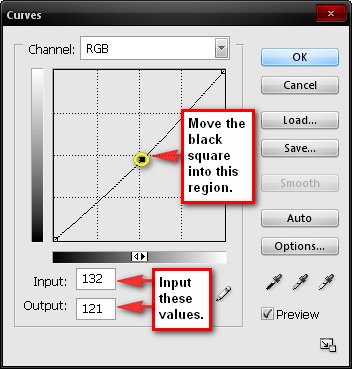
Next, we’ll make use of a Curves adjustment layer. Input the following values on their respective fields:
Next, let’s utilize another Solid Color adjustment layer. Input the following value on the “#” box:
Then change its Blending mode to Color Burn and its Opacity to 60%.
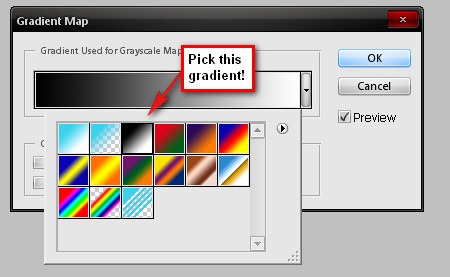
Finally, let’s add a Gradient Map filter still through the Create new Fill layer/Adjustment layer button. Let’s utilize the default gradients; pick the Black and white gradient.
Now that we’re almost done, go to File > Save as… and save the image as a PSD file so you may access the whole image with its layers, in the future if you deem to make some changes.
Step 6 - Give the image a dreamy atmosphere
In this step, we would be making the image look soft and dreamy, therefore, making it look magical.
To be able to do that, we would need to flatten the layers. To flatten, right click on any layer and pick Flatten Image from the contextual menu.
Now we’re ready to do this step. While the image is selected, go to Filter > Blur > Gaussian Blur and input the following value:
The image is blurry, now is this the dreamy atmosphere that we want to achieve? No. To make it dreamy, change its Blending mode to Lighten and its Opacity to 60%.
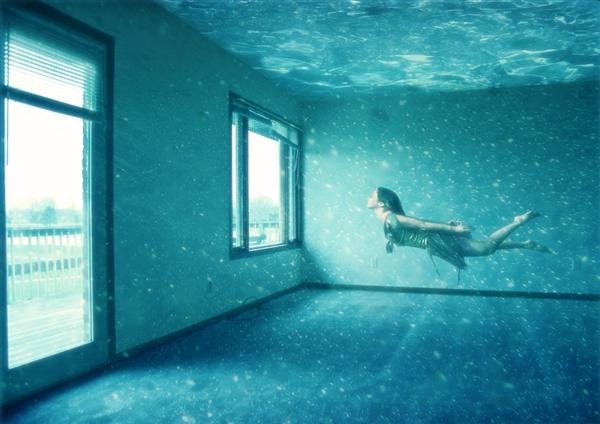
Final Results

Tidak ada komentar:
Posting Komentar