Group 1 - Background(BG)
Lets start off with a new blank canvas with white (#ffffff) as the background. Make a new layer (Ctrl + Shift + N) and fill it with a gradient going from the top left to bottom right corner of the canvas.![2[4]](http://photoshoptutorials.ws/images/stories/FashionModelPoster_10B6D/24.jpg "2[4]")
- Orange : #ffb33a
- Pink : #fd0083
![3[4]](http://photoshoptutorials.ws/images/stories/FashionModelPoster_10B6D/34.jpg "3[4]")
Next we add the patterned background over it.
- Blend Mode : Luminosity
- Opacity : 55%
Extraction Of Girl
As you can see, this image is totally messed up. Nothing matches with the artwork we've made so far; lighting , color , mood. And this is where Photoshop comes in.![5[4]](http://photoshoptutorials.ws/images/stories/FashionModelPoster_10B6D/54.jpg "5[4]")
![6[4]](http://photoshoptutorials.ws/images/stories/FashionModelPoster_10B6D/64.jpg "6[4]")
- Feathered Radius : 2px
- Check anti-aliased.
![7[4]](http://photoshoptutorials.ws/images/stories/FashionModelPoster_10B6D/74.jpg "7[4]")
Group – Girl
Using a soft round brush on the layer mask of the girl, remove the part of the hair where the background is showing. Also move it at places where the edge is too rough. Now we have one complete image. Good.![8[4]](http://photoshoptutorials.ws/images/stories/FashionModelPoster_10B6D/84.jpg "8[4]")
![9[4]](http://photoshoptutorials.ws/images/stories/FashionModelPoster_10B6D/94.jpg "9[4]")
- Horizontal Scale 40
- Vertical Scale 40
- Stretch To Fit
- Repeat Around Edges
![11[4]](http://photoshoptutorials.ws/images/stories/FashionModelPoster_10B6D/114.jpg "11[4]")
Choose Layer > Layer Style > Drop Shadow. In the layer style select Drop Shadow with the following settings.
![properties[4]](http://photoshoptutorials.ws/images/stories/FashionModelPoster_10B6D/properties4.jpg "properties[4]")
Group - Girl - Continues
In the Girl Group , we have 2 layers 1. "displaced" girl 2. hidden copy of the original girl. If you don't have this then go back and recheck. No point going further and later cribbing that you couldn't get the output. Unhide this copied layer,name it 'overlay' and make another copy. Hide this 'another copy' for now. So far so good? Select 'overlay'. Ctrl+Click on thumbnail of 'displaced' girl then click on the button at the bottom saying 'add vector mask'. Now with the splatter brush remove some of the hair and with a soft brush, some of the arms. Change the blending mode to Overlay and set opacity to 50%.![13[4]](http://photoshoptutorials.ws/images/stories/FashionModelPoster_10B6D/134.jpg "13[4]")
Now in the Girl Group we have 3 layers 1.'displaced' girl. 2.'overlay' girl 3.hidden copy of original girl. Unhide this hidden copy name it 'smoothing' and make another copy. Hide the 'another copy' for now. This 3rd girl layer is just to smooth things up. Change the opacity to 50%, add a vector mask and paint it black so everything's hidden. Now with a soft white brush paint over the layer mask to reveal certain parts as shown below.
![15[4]](http://photoshoptutorials.ws/images/stories/FashionModelPoster_10B6D/154.jpg "15[4]")
![16[4]](http://photoshoptutorials.ws/images/stories/FashionModelPoster_10B6D/164.jpg "16[4]")
- Levels: 3
- Simplicity: 4
- Fidelity: 3
![17[4]](http://photoshoptutorials.ws/images/stories/FashionModelPoster_10B6D/174.jpg "17[4]")
![18[4]](http://photoshoptutorials.ws/images/stories/FashionModelPoster_10B6D/184.jpg "18[4]")
![19[4]](http://photoshoptutorials.ws/images/stories/FashionModelPoster_10B6D/194.jpg "19[4]")
Group - Sparkle
This group will be below Girl group and will have two layers. Sparkle & small Sparkle We could download tons of sparkle brushes from the internet but i thought of making my own. Here’s how. Take a soft round brush of approx. 35-40 px size. Go to Window > Brushes or F5. Apply the settings as given below.![21[4]](http://photoshoptutorials.ws/images/stories/FashionModelPoster_10B6D/214.jpg "21[4]")
![22[4]](http://photoshoptutorials.ws/images/stories/FashionModelPoster_10B6D/224.jpg "22[4]")
![23[4]](http://photoshoptutorials.ws/images/stories/FashionModelPoster_10B6D/234.jpg "23[4]")
![24[4]](http://photoshoptutorials.ws/images/stories/FashionModelPoster_10B6D/244.jpg "24[4]")
Group - Butterfly
This group is the simplest. Just get some butterfly brushes from the net. The reason it has 3 layers is that i have made just one butterfly per layer so that i can adjust size and placement without affecting the others.![25[4]](http://photoshoptutorials.ws/images/stories/FashionModelPoster_10B6D/254.jpg "25[4]")
Group - City Skyline
This group is above Butterfly and contains basically 2 layers. The upper Skyline & below it Skyline Glow. Just extract the skyline from the image onto the canvas and place it in that group. Make Create a new layer above it. Ctrl+Click on thumbnail of skyline to get its shape. Now with the Rectangular Marquee Tool (M) set to "Intersect with selection" select about 3/4 of the skyline from the right and paint it black. Apply the following settings- Blend Mode: Soft Light
- Opacity: 70%
![27[4]](http://photoshoptutorials.ws/images/stories/FashionModelPoster_10B6D/274.jpg "27[4]")
Now change the Blend Mode of this merged skyline to Soft Light. Now make a layer BELOW skyline and name it skyline glow. If you notice the glow is very uneven. More in some places and very less in others. Before we start with the glow we need to make the brush. Again like the with the Sparkle brush, select a soft 3px brush. Go to Windows > Brushes (F5) then apply the properties shown below.
![29[4]](http://photoshoptutorials.ws/images/stories/FashionModelPoster_10B6D/294.jpg "29[4]")
![30[4]](http://photoshoptutorials.ws/images/stories/FashionModelPoster_10B6D/304.jpg "30[4]")


Group - TAG
This group stays below Sparkle and contains 2 layers ; one copy of the other. This is probably the oldest (and my favorite) trick in the book. Using the Rectangular Marquee Tool(M) make a selection above the belly of the girl. Fill it with Purple : #a52d5c I've added another color within it (#831734) but you can stick to one for simplicity.


Group - TXT
Again this text employs the same method used in the Skyline Glow case with a different approach. Select a nice font(Angelina) and write out whatever text you want. Keep it over the TAG part of the image so as to bring out contrast. Hide the layer. Ctrl+Click on thumbnail . Select the Lasso Tool(L). Right click near the marching ants and select Make Work Path --> Tolerance 2px.
Group - Background(BG) - Final Touches
Still find something missing? That's right. Only one layer, but which changes the artwork completely. Go to the Background(BG) Group Above the Pattern layer, make a new layer and name it "lens flare' Paint it black completely. Go to Filter > Render > Lens Flare Select the 105mm Prime with 150% Brightness. Angle the flare such that the main part falls on the body and the tail on the 'cutout' girl (face) This might take a few attempts to get right. Set the layer blend mode to Hard Light and opacity to 90%. Presto~! Notice the difference. The artwork looks much more attractive now. If you feel the brightness is still less then you can add an additional layer above the flare with 25% opacity and paint some splashes white.
Final Setup Of Layers
Have a look at the final Set up of layers. It should help you eliminate any doubts.Hope you enjoyed this tutorial as much as you found it helpful. If you have any doubts,get stuck at any point, or just need some info, you can leave a comment or just contact me at my email address - digitalcompositions@gmail.com

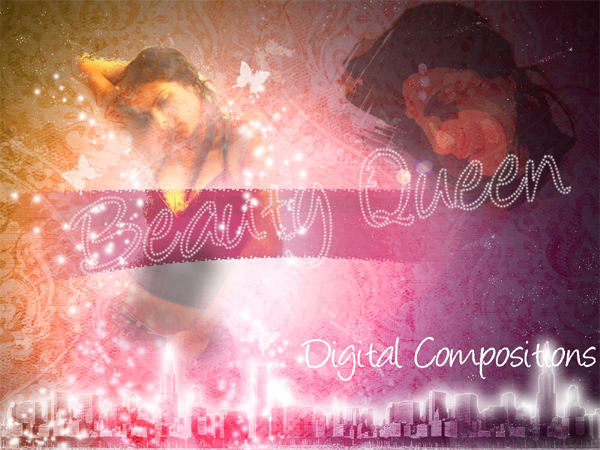
Final Results
Tidak ada komentar:
Posting Komentar